How to prepare the printer for printing again
1. If the ink was flushed, contact your service representative to recover the printer.
2. For Color cartridges, place every cartridge on a flat surface and turn it four times (rotating it through 360 degrees), as indicated on the label, to ensure that the ink is well mixed before using it.
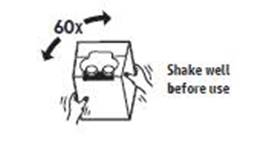
 For the White cartridge, shake it 60x times while rotating it to ensure it will be well mixed.
3. Insert the cartridges on the printer and connect the cartridge connector.
4. Remove each intermediate tank as shown below and shake it for 15 seconds before reinstalling. Then insert it back to its original position.
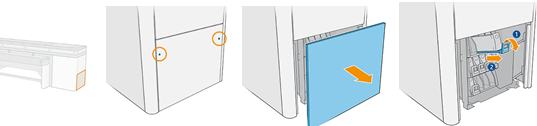
IMPORTANT: In order to avoid mixing positions of intermediate tanks, do this procedure one intermediate tank each time.
5. Turn on all the power switches in case they were disconnected.
6. Tap the power icon, at the right top of the IPS screen, and select Start in normal mode.
7. Run the 47010 Water system purge diagnostic under the Setup Menu.
a. Check that the Cleaning roll is installed.
b. Fill up the water tank with distilled water.
IMPORTANT: Do not use the removed water to refill the tank; use new distilled water instead.
i. Locate the cap on the output path side cover and open it.
ii. Refill the tank with distilled water.
IMPORTANT: The water tank has a maximum capacity of 12 liters.
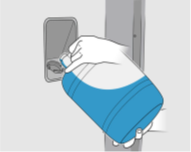 CAUTION: Be careful while filling the tank, as there is no level indicator. Take care not to spill water outside the tank.
iii. Close the water tank cap and tap Next.
c. Open the carriage cover and tap the Purge button to fill up the water dispenser system. The cleaning roll will advance 5.08 cm (2 inches) and some water will be purged on the cloth. If no water is present in the cloth, tap again the Purge button until the water is fired.
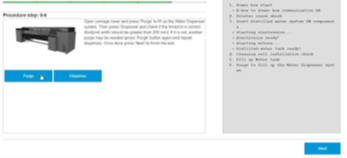
Then, tap Dispense and check if the water footprint is correct (the footprint width should be greater than 200 mm). If not, another Purge may be needed (tap the Purge button again and repeat Dispense).
d. Once done, tap Next to finish the test.
The following steps, 8 to 14, need to be followed sequentially in order to maximize the chances of printhead recovery.
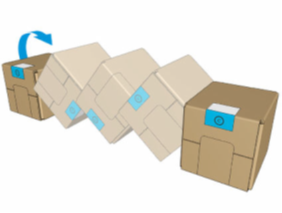
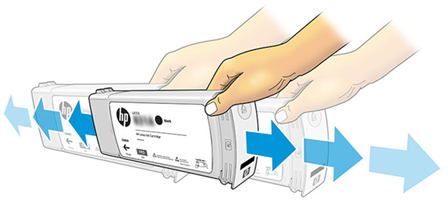
8. Only if the printheads had been removed, shake all printheads 10 times according to the following image:
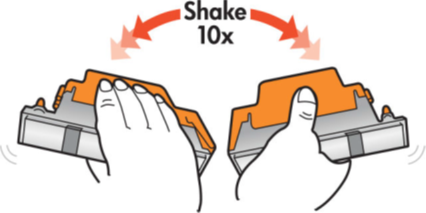
IMPORTANT: If the orange caps (plastic and rubber protector) are not available, do not shake the printheads.
9. Only for the overcoat (OC) printhead, if it had been removed, before inserting the printhead in the printer, follow the Manual printhead cleaning procedure available on this link.
IMPORTANT: Make sure not to pour any water on the electrical contacts, or any other part of the printhead aside from the nozzles, since it could damage the printhead irreversibly.
10. Only for those printheads which had been removed, insert the printheads by following the standard replacement procedure. When the printheads are inserted, the printer will automatically perform some printhead cleaning routines.
11. Perform a printhead Hard Clean routine for all colors.
12. Use the Nozzle check plot to evaluate the printhead health. If the printhead health requires improvements, continue with steps 13 and 14.
13. Perform a printhead Hard Clean on all colors where the printhead health requires improvement.
14. Once the Hard Clean is completed, evaluate again the printhead health as recommended in step 12. If the printhead health has been recovered, move to step 15. Otherwise, repeat steps 13 and 14 performing up to 3 Hard Clean routines.
15. Launch a Printhead alignment.
16. The printer should be ready to start production.
For any additional help or clarification, please contact your support representative.